
How to Register for PM Surya Ghar Muft Bijli Yojana: Complete Solar Rooftop Subsidy Guide
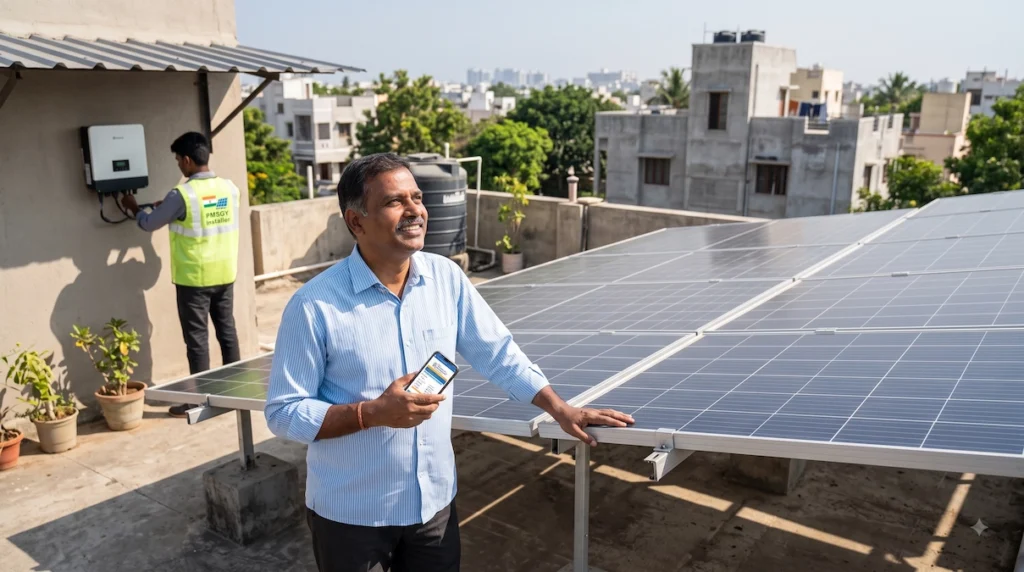
Overview of the PM Surya Ghar Muft Bijli Yojana
A household that installs rooftop solar under PM Surya Ghar can receive up to ₹78,000 in central government support. In many states, there can also be a separate payment from the state government. The scheme has expanded quickly. In the 10 years before it launched, India had fewer than 8 lakh rooftop solar installations. PM Surya Ghar crossed 50 lakh installations in just two and a half years. The sections below cover registration on the national portal, the documents DISCOMs check, the subsidy calculation for different system sizes, and the reasons applications are rejected. The information comes from the scheme’s own guidelines, government data, and DISCOM and vendor documentation. But to benefit from the scheme, one needs to know how to register for the PM Surya Ghar Muft Bijli Yojana.
At A Glance: How to register for PM Surya Ghar Muft Bijli Yojana
- Core Benefit: Provides up to 300 units of free electricity per month through rooftop solar installations.
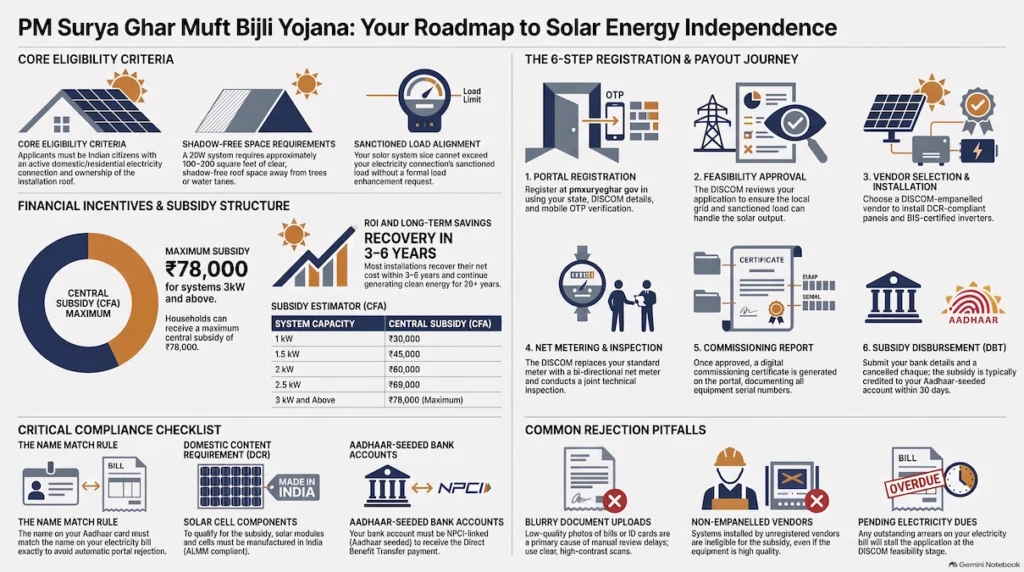
- Subsidy Structure: Receive a central subsidy of ₹30,000 for 1kW, ₹60,000 for 2kW, and a maximum of ₹78,000 for 3kW systems (plus potential state top-ups).
- Key Eligibility: You must have an active electricity connection in your name and own a shadow-free roof (roughly 160-200 sq ft required for a 2kW system).
- Essential Documents: Your name must match exactly across your Aadhaar card and electricity bill. Your bank account must be Aadhaar-seeded (NPCI linked) to receive the Direct Benefit Transfer (DBT).
- Vendor Rules: Installations must be completed by a DISCOM-empanelled vendor using DCR (Domestic Content Requirement) compliant solar panels.
- Subsidy Timeline: The central subsidy amount is credited directly to your bank account within roughly 30 days after successful DISCOM inspection and system commissioning.
What is the National Rooftop Solar Free Electricity Scheme?
PM Surya Ghar: Muft Bijli Yojana is a central government scheme that gives households a direct subsidy for installing grid-connected solar panels on their own roofs. The Union Cabinet approved it on 29 February 2024, and it took effect from 13 February 2024, the day Prime Minister Narendra Modi launched it.
The Ministry of New and Renewable Energy (MNRE) runs the scheme nationally through REC Limited, its designated agency. The local DISCOM handles the work at the household level, including feasibility approval and the final inspection.
The scheme has a total outlay of ₹75,021 crore, with ₹65,700 crore set aside for household subsidies through the end of FY2026-27 mnre.gov.in/en/notice/guidelines-for-pm-surya-ghar-muft-bijli-yojana/. The 2026-27 Union Budget allocated ₹22,000 crore for the year, compared with a ₹17,000 crore revised estimate the year before.
Core Objectives and Vision of the Central Government Initiative
The scheme targets 1 crore rooftop solar installations in the residential sector, with the aim of giving those households free or near-free electricity for up to 300 units a month. It also targets 30 GW of new rooftop solar capacity by 2026-27, along with a vendor and manufacturing base in India and greater household energy security in cities and villages. By early August 2026, the scheme had reached about half of its one-crore installation target. The monthly pace was still rising.
Also Read: Ration Card E-KYC Mismatch? A Step-by-Step Guide to Correcting Your Data Online
Key Benefits of Transitioning to Residential Solar Power
For a household, the most obvious benefit is a lower electricity bill. Nearly 19 lakh households currently pay nothing for power because their rooftop systems cover their full monthly consumption.
There is also money to be made when a system produces more electricity than the household needs. More than 12 lakh households sold surplus power back to their DISCOMs in FY 2024-25 and earned ₹421 crore in total, an average of roughly ₹3,500 a year per exporting household. That is not a huge amount by itself, but it changes the household’s relationship with the grid. Instead of only buying electricity, the household can also send some back. Most installations recover their net cost within three to six years and then continue operating for the remaining two decades of a panel’s rated life.
Environmental Impact and Long-Term Energy Savings
Over the 25-year working life of systems installed under the scheme, MNRE projects about 1,000 billion units of clean electricity generation and roughly 720 million tonnes of avoided CO2-equivalent emissions if the full one-crore target is reached.
Rooftop installations under PM Surya Ghar have also become a major part of India’s residential solar growth. The daily installation rate rose from roughly 5,038 in October 2025 to nearly 16,328 by July 2026, more than tripling in nine months. July 2026 alone added 5.06 lakh households, the highest monthly addition since the scheme began. Cumulative rooftop capacity commissioned under the scheme now stands at 14.8 GW.
Detailed Breakdown of the Solar Rooftop Subsidy Structure
The subsidy is based on the installed system capacity, not on whatever amount a vendor charges. MNRE sets a benchmark cost per kW, and the subsidy is calculated as a fixed percentage of that benchmark. A vendor charging above the benchmark does not get a higher subsidy, while a lower invoice can limit the payout to the actual cost.
When the scheme launched, MNRE set the benchmark at ₹50,000 per kW for the first 2 kW and ₹45,000 per kW beyond that. Special category states had slightly higher figures of ₹55,000 and ₹49,500. The guidelines also provide for periodic revisions as module and inverter prices change.
| System Capacity | Central Subsidy (CFA) | |
| 1 kW | ₹30,000 | |
| 1.5 kW | ₹45,000 | |
| 2 kW | ₹60,000 | |
| 2.5 kW | ₹69,000 | |
| 3 kW and above | ₹78,000 (maximum, flat regardless of size) | |
| GHS / RWA common facilities, per kW (up to 500 kW total) | ₹18,000 | |
Subsidy Allocation for 1kW to 2kW Solar Systems (Up to ₹60,000)
For the first 2 kW, the subsidy is 60 percent of the benchmark cost, which comes to ₹30,000 per kW. A 1 kW system gets ₹30,000, while a full 2 kW system gets ₹60,000. A 1.5 kW system gets ₹45,000. The amount is worked out from the exact capacity installed, rather than being rounded to the nearest whole kW.
Subsidy Allocation for 2kW to 3kW Solar Systems (Up to ₹78,000)
Capacity above 2 kW gets a lower rate, 40 percent of the benchmark, or ₹18,000 for each additional kW up to the third kW mnre.gov.in/en/notice/guidelines-for-pm-surya-ghar-muft-bijli-yojana/. A 2.5 kW system gets ₹60,000 for the first 2 kW and another ₹9,000 for the extra half kW, bringing the total to ₹69,000. A 3 kW system gets the full ₹78,000, which is the maximum for an individual residential connection. This tier is intended for households using 150 to 300 units a month.
Capping Rules for Solar Installations Exceeding 3kW Capacity
A household can install 5 kW or 10 kW of panels, but the central subsidy stops at ₹78,000 regardless of system size. A 5 kW system gets the same central payment as a 3 kW system. The reason to install a larger system therefore comes down to the household’s electricity needs, not a larger subsidy.
Housing societies have a separate provision: Group Housing Societies and Resident Welfare Associations installing shared solar for lifts, corridor lighting, or EV charging can receive ₹18,000 per kW for common-area capacity up to 500 kW in total, with a cap of roughly 3 kW per member household.
Understanding the Difference Between Central and State Solar Subsidies
The ₹78,000 figure is only the central government’s share. Several states add their own subsidy to the same installation, with the payment routed through the national portal after the state signs a memorandum of understanding with MNRE.
Tamil Nadu’s 2026-27 budget introduced a state subsidy of up to ₹1 lakh on top of the central amount. That means a resident could receive close to ₹1.78 lakh in combined support for a 3 kW system.
Gujarat has offered per-unit incentives through its state renewable energy agency that can take combined assistance past ₹1 lakh in some categories. Assam, Delhi, Goa, Uttar Pradesh, Rajasthan, Maharashtra, and Uttarakhand have also run their own top-up schemes at different points. State schemes can change without much notice, so the central ₹78,000 should be treated separately from any state amount. Check the current state figure with the relevant state nodal agency before signing a vendor contract.
Eligibility Criteria for the PM Surya Ghar Yojana
Applicant Citizenship and Basic Prerequisites
The applicant needs an Indian residential address and an active, grid-connected electricity account in their own name or a co-owner’s name. The connection must be under the domestic or LT-residential billing category. Commercial, industrial, and agricultural connections fall under separate schemes and are not eligible here.
There is no income cutoff, and the scheme does not restrict applicants based on whether they live in a rural or urban area. Standard eligibility applies up to a sanctioned load of 10 kW. As of 2026, the portal grants deemed approval with a feasibility waiver automatically for systems in that range, removing a step that previously slowed smaller household applications.
Property and Residential Roof Ownership Rules
The applicant, or a family member named on the electricity account, needs to own the roof where the panels will be installed. Simply living in the property is not enough. A tenant cannot apply in their own right. The electricity connection must either be transferred, or the landlord must provide a no-objection certificate and the two must apply jointly. The subsidy still goes in the name attached to the electricity account.
The roof also needs roughly 80 to 100 square feet of shadow-free space for every kilowatt of panel capacity. A 2 kW system therefore needs around 160 to 200 square feet of clear roof space, away from water tanks, overhanging trees, or shadows from neighbouring buildings for most of the day.
Valid Electricity Connection and Sanctioned Load Requirements
The system size a household installs cannot exceed the sanctioned load on its electricity connection. A house with a 2 kW sanctioned load cannot install a 5 kW system without first submitting a load enhancement request to the DISCOM. Check the sanctioned load printed on a recent electricity bill before a vendor finalises the proposal. A mismatch here can lead to a rejected application later.
Rules Regarding Previous Solar Panel Subsidies
A residential connection can receive the central CFA only once. If a household has already claimed a subsidy under this scheme, or under the earlier Phase II Grid Connected Rooftop Solar Programme at the same address, it cannot claim the subsidy again for the same capacity mnre.gov.in/en/notice/guidelines-for-pm-surya-ghar-muft-bijli-yojana/. There is a limited exception for households adding capacity. Someone who installed 1 kW under an earlier programme and later expands the system to a combined capacity of 3 kW can claim the difference under the current rates, but only for the additional capacity, not for the whole system again mnre.gov.in/en/notice/guidelines-for-pm-surya-ghar-muft-bijli-yojana/. Systems installed without going through an MNRE-empanelled vendor generally cannot be brought into the scheme after installation.
Essential Documents Required for PM Surya Ghar Registration
The rejected applications reviewed by Heaven Green Energy and Reslink generally came down to a handful of document issues, most of which were caught before installation rather than afterward. Having these documents ready before filling out the online form can save another trip to the DISCOM office later.
Common Application Rejection Reasons and Solutions
| Rejection Reason | Fix |
| Bank account not Aadhaar-seeded | Link Aadhaar to the account at a branch, via the bank app, or the NPCI portal, before DISCOM inspection |
| Name mismatch between Aadhaar and electricity bill | Correct the bill name at the DISCOM office before applying, not after |
| Wrong consumer number entered | Re-check against the physical bill; it is not the meter serial number |
| Pending electricity dues | Clear arrears and get a no-dues certificate before applying |
| Non-empanelled vendor or non-ALMM panels | Confirm vendor registration and current ALMM listing before signing |
| System size exceeds sanctioned load | File a load enhancement request with the DISCOM first |
| Blurry or incomplete document uploads | Re-photograph in good light against a plain background |
| Missing housing society NOC | Pass a general body resolution and secure the NOC before applying |
Core Identity and Address Proofs (Aadhaar and PAN Card)
Aadhaar is used for identity verification, and the subsidy is eventually paid through Aadhaar-linked Direct Benefit Transfer. The name on the Aadhaar card and the electricity bill needs to match exactly.
Even a small difference, such as “Ramesh Kumar” on one document and “R. Kumar” on the other, can trigger an automatic rejection during portal verification. If there is a mismatch, get the electricity bill corrected at the DISCOM office before applying.
Electricity Bill and Consumer Number Specifications
The consumer account number on the electricity bill, usually ten to twelve digits, links the application to a particular electricity connection www.heavengreenenergy.com/blog/pm-suryaghar-complete-guide. Applicants sometimes enter the meter serial number instead. The two numbers can look similar on the bill, but the portal treats them differently, and the wrong consumer number will fail DISCOM verification. Any pending dues also need to be cleared first. Even a small unpaid amount can stop the application from moving past the DISCOM stage.
Bank Account Requirements for Direct Benefit Transfer (DBT)
The subsidy is credited to the applicant’s bank account. If a solar loan was taken, the payment first goes toward the amount still owed on that loan, with any remaining amount paid to the applicant. The portal accepts a cancelled cheque, bank passbook scan, or e-statement showing that the account belongs to the applicant.
The account must also be Aadhaar-seeded. A non-Aadhaar-seeded account can hold up the subsidy after the rest of the process has been completed, so check the Aadhaar-bank linkage through the bank’s app or the NPCI portal before the DISCOM inspection.
Additional Documentation for Rented Properties and Tenants
A tenant applying with the landlord’s consent needs a signed no-objection certificate from the property owner in addition to the standard documents. Since the subsidy follows the name on the electricity connection rather than the person who paid for the panels, most tenant applications in practice are made jointly with the landlord’s name on the account and the NOC giving the tenant permission to install.
Special Requirements for Housing Societies and Joint Property Owners
A Group Housing Society or Resident Welfare Association applies through a separate category on the portal, using its registered society credentials and the consumer number for the shared meter rather than an individual flat’s connection.
Before applying, the managing committee needs to pass a formal resolution at a general body meeting authorising the installation and issue a no-objection certificate. The DISCOM will not approve a multi-user grid connection without that approval. Individual flat owners can still apply separately for their own electricity connection, and those applications are handled independently.
Step-by-Step PM Surya Ghar Portal Registration Process
Registration itself takes most applicants under fifteen minutes once the documents above are in hand. It happens entirely on the national portal, pmsuryaghar.gov.in pmsuryaghar.gov.in/.
Accessing the Official National Portal
The homepage has a Consumer login option, which is where a new applicant starts www.vikramsolar.com/pm-surya-ghar-muft-bijli-yojana-rooftop-solar-subsidy-guide/. First-time users click Register. Returning applicants log in with the mobile number already linked to their account. A national toll-free helpline, 15555, is also available for anyone who gets stuck at this stage during government working.
Entering State, District, and DISCOM Details
The form asks for the state, followed by the district and the specific DISCOM serving the property. India has dozens of distribution utilities, and the portal sends the later stages, including feasibility, inspection, and net metering, to the utility serving that particular electricity connection mnre.gov.in/en/notice/guidelines-for-pm-surya-ghar-muft-bijli-yojana/. Check the DISCOM against the electricity bill before submitting. Getting it wrong at this stage can cause problems later.
Verifying Your Electricity Consumer Number
Next, enter the electricity consumer account number from a recent bill. The portal checks it against the DISCOM’s records in real time, so a typing mistake can stop the application before it moves ahead.
Mobile Number and Email OTP Verification Process
An OTP is sent to the mobile number on file, usually the number registered with the DISCOM. The applicant also has to verify their email address. If the mobile number on the electricity account is outdated, it needs to be updated with the DISCOM first. The portal will not send the OTP to a number that does not match its records.
Navigating the PM Surya Ghar Mobile Application
Everything available on the desktop portal is also available through the scheme’s mobile app and WhatsApp, which MNRE created to make access easier for people who may not be comfortable using a full. Application status, DISCOM messages, and grievance tracking sync across the app and web portal, so moving between them does not mean starting the application again.
Completing the Online Solar Subsidy Application Form
Logging In with Registered Credentials
Once registered, every later visit uses the same mobile number and OTP combination instead of a separate password. That keeps the login step short, but losing access to that phone number can leave an applicant locked out while the application is still being processed.
Inputting Sanctioned Load and Monthly Electricity Consumption
The form asks for average monthly electricity consumption in units and the sanctioned load on the connection. Several vendors use a rough sizing rule: divide monthly consumption in kWh by about 120 to get a starting system size in kW. In regions with fewer peak sun hours during winter, the size may need to come down slightly.
A household paying ₹2,000 to ₹4,000 a month, or roughly 200 to 400 units, will typically fit a 2 to 3 kW system. A household paying ₹7,000 or more usually needs 5 kW or above.
Uploading Property Proofs and Identification Documents
This is where the Aadhaar card, electricity bill, bank details and, where required, property ownership proof from the document checklist are uploaded as scans or clear photographs. Blurry or partly cropped files can delay the application. The portal’s automated checks and the DISCOM’s manual review both need the text to be readable.
Finalizing and Submitting the Initial Application
Submitting the form generates a unique application ID. That number becomes the reference for later dealings with the DISCOM and the portal’s grievance system. The application then moves to the DISCOM for feasibility review. It remains active on the portal for six months from the date of submission. If there is still no movement after that period, it is marked dormant and has to be reactivated manually from the applicant’s profile.
DISCOM Feasibility Approval and Technical Assessment
The Role of Your Local Electricity Distribution Company (DISCOM)
The DISCOM is the state-level agency that handles the scheme locally. It checks feeder capacity, issues feasibility approval, inspects the finished installation, and signs the net metering agreement.
MNRE and the national portal set the rules, while the DISCOM applies them to individual connections. The time an applicant spends waiting can vary between states because each DISCOM works through its own queue.
How DISCOM Evaluates Rooftop Structural Stability and Sanctioned Load
The feasibility review checks whether the local transformer, feeder, and grid connection point can handle the proposed system’s output. It also checks that the proposed capacity does not exceed the sanctioned load.
In areas where a feeder already has a large amount of rooftop solar, the DISCOM may recommend a smaller system instead of approving the full capacity. For systems up to 10 kW, deemed approval with a feasibility waiver now applies automatically in most states, removing this step for most residential applicants.
Checking Your Feasibility Approval Status Online
The applicant can check the status at each stage through the portal dashboard. The portal also sends SMS and email updates as the DISCOM moves the application forward. Where a separate feasibility approval is still required, the time can range from about three working days at faster urban utilities to nearly four weeks in places with a heavier backlog.
Installation should not begin until the approval comes through in writing. Starting early does not automatically cancel the subsidy, but it can create problems if the DISCOM later raises a technical objection about the site.
Choosing the Right Empanelled Solar Vendor
Why You Must Select a DISCOM-Registered Vendor
Only a vendor registered on the national portal can file the commissioning report that triggers DISCOM inspection and subsidy release. A system installed by an unregistered vendor is not eligible for the CFA, even if the installation itself is done properly
Vendors register by submitting PAN details, incorporation documents, information about key personnel and training records, along with a bank guarantee. The starting guarantee is ₹2.5 lakh per state for state-level registration or ₹25 lakh for national registration. The amount rises after a vendor has installed a certain volume of capacity.
Registration with one DISCOM does not automatically carry over to a neighbouring DISCOM in every state, so check that the vendor is currently registered for your district before signing anything.
Comparing Vendor Service Records and Regional Presence
The portal has a vendor rating system based on installation history, consumer feedback, reported generation data, and physical inspection results. Applicants can see these ratings while looking at vendors in their district. The household and vendor decide the price and system specifications directly.
The scheme has no tender process and no fixed installation rate. It sets the minimum technical requirements that the system must meet. Among established vendors, paying roughly 70 percent before installation and the remaining 30 percent after the subsidy is confirmed is common. A vendor asking for the entire payment upfront, before any DISCOM inspection, deserves caution.
Scheduling the Pre-Installation Site Survey
After a vendor is selected, the usual next step is a site visit. The vendor checks the roof’s orientation, shade during the day, how much weight the roof can safely carry, and the cable route back to the meter box. Vendors handling high volumes generally complete the survey and provide a firm proposal within a day or two of the initial enquiry.
Understanding Domestic Content Requirement (DCR) Panel Rules
Every panel installed under the scheme must meet the Domestic Content Requirement. The modules have to be manufactured in India using solar cells that were also manufactured in India.
The applicant’s DCR undertaking is checked against a 16-digit digital certificate confirming that the module and its cells were made domestically. Imported Chinese panels cannot generate this certificate.
DCR sits alongside a separate MNRE system called the Approved List of Models and Manufacturers, or ALMM. List I covers modules, while List II covers the domestic cells inside them. From 1 June 2026, List II compliance became mandatory for net-metering and open-access solar projects, including PM Surya Ghar, in addition to the existing DCR rule.
Since domestic cell manufacturing capacity has lagged behind module assembly capacity, MNRE issued a memorandum on 18 July 2026 giving standard net-metering installations, including PM Surya Ghar, a blanket exemption from the List II cell requirement through 31 December 2026.
Consumers who choose the “Give It Up” route and give up the central subsidy get a longer exemption from List II, through 31 March 2027. List I module compliance and the original DCR requirement remain mandatory. Only the newer cell-sourcing requirement has been deferred. Since the approved lists can change during the year, check the panel’s exact ALMM status with the vendor when placing the order rather than relying on an earlier quotation.
Solar Panel Installation and System Integration
Finalizing Technical Specifications (Panels, Inverters, and Wiring)
A residential rooftop system under the scheme consists of solar modules, an inverter, mounting structure, an energy meter, junction boxes, protective earthing, surge arrestors, and the cables connecting them. All of these components have to meet the minimum specifications published and updated by MNRE.
Panels generally need a manufacturing and workmanship warranty of at least 5 years. Some modules on the market offer 25 to 30 years of performance warranty, with 80 to 87 percent output retention at year 25. DC cabling needs to meet a minimum 4 sqmm specification, and earthing has to follow IS 3043.
Execution of the Rooftop Solar Installation by the Vendor
Physical installation of a standard residential system usually takes one to three days once the materials reach the site. The mounting structures have to withstand the local wind load under IS 875 Part 3. A raised, stilt-mounted array needs at least 8 feet of ground clearance to qualify for the subsidy. The vendor photographs the completed array, safety devices, and meter for the commissioning package that the DISCOM will later check.
Ensuring BIS-Certified Equipment and Safety Standards
Inverters need Bureau of Indian Standards certification and must comply with IEC 62109 or the equivalent Indian standard. They also need an islanding-prevention function that automatically disconnects the system from the grid during a power cut. This protects linemen working on the network and prevents the household’s panels from feeding electricity into a line that is supposed to be dead. The DISCOM checks building safety and equipment earthing as separate items on its inspection checklist. A problem with either one can have different consequences, so they are checked separately.
The Net Metering Application and Grid Connection Process
What is a Bi-Directional Net Meter?
A standard electricity meter records power flowing in one direction, into the house. A net meter records both directions: electricity drawn from the grid and surplus power sent back from the rooftop system. The monthly bill is then calculated from the difference between the two.
In Tamil Nadu, for example, the household uses the solar power generated on its roof first. Any surplus then flows back to the Tangedco grid and is adjusted against the next bill.
Submitting the Net Meter Application to Your DISCOM
Once the installation is complete, the vendor files the net metering application with the DISCOM. The submission includes the system’s single-line diagram, equipment certificates, and layout. In most states, this application and the commissioning inspection tend to happen together rather than as two completely separate visits.
Payment of Necessary DISCOM Fees and Charges
Under the scheme rules, the applicant generally pays net metering costs other than the meter itself. The exact charges vary by state. By mid-2026, 32 states and Union Territories had removed their application and net-metering fees. Where a state still charges a metering fee, it is a modest one-time payment rather than a recurring expense.
Joint Inspection by DISCOM Officials and Vendor
A DISCOM engineer inspects the completed system with the vendor’s representative. They check whether the installed capacity matches the application, whether safety earthing is in place, and whether the equipment matches what the vendor declared.
The DISCOM installs the bi-directional net meter only after the joint inspection passes, and then signs the net metering agreement. The agreement runs for 25 years and can end early only by mutual consent or with 30 days’ notice from either side.
System Commissioning and Generating the Report
The Post-Inspection Commissioning Process
Commissioning is the formal step where the DISCOM confirms that the system has been installed as approved and clears it for connection to the live grid. The DISCOM fills out its own checklist on the portal. It covers the electricity bill, correctly uploaded geo-tagged photographs, and whether the inverter can transmit generation data online.
Generating the Official Commissioning Certificate on the Portal
Once the inspection passes, the national portal generates a DISCOM Report. The DISCOM’s nodal officer digitally signs it, and the report allows the applicant to move on to the next stage of the subsidy claim. It records the applicant’s details and the vendor’s details, along with the model and serial numbers of the solar modules and inverter. It also contains declarations from the consumer and vendor confirming that no earlier subsidy was claimed at the same address and that the installation follows MNRE’s guidelines.
Uploading Site Photographs and Equipment Details
Four photographs are required: the full solar module array from the front or at an angle, the safety equipment including earthing and surge protection, the net meter with the generation reading clearly visible, and the beneficiary standing beside the completed installation. Dark or cropped photos, or images where the meter reading cannot be read, can be sent back for resubmission. That can add another delay to the process.
How to Claim and Receive Your Solar Subsidy Amount
Submitting the Commissioning Report for Final Approval
Once the DISCOM Report is on file, REC Limited reviews the uploaded photographs, GPS data, and account details. It then generates an e-token, which carries the exact subsidy amount due to the applicant.
Uploading Cancelled Cheque and DBT Bank Account Details
The applicant redeems the e-token by logging into their portal profile and confirming the bank details already on file, along with the cancelled cheque or passbook image. If a loan was used to finance the installation, the CFA is first applied to the outstanding loan balance. Any amount left over is paid into the applicant’s account.
Tracking Subsidy Disbursement Status
The subsidy disbursement status appears on the same dashboard used earlier in the application process. The portal also sends an SMS and email once the payment has been transferred. The DISCOM login lets users check a registered vendor’s status and see the current stage of an application.
Expected Timeline for Subsidy Credit (The 30-Day Window)
The scheme guidelines set a 15-day processing period for the CFA after the redemption request is submitted, provided all the required documents are in place. The government has also cited 15 days as the standard payment period. That is only the payment stage.
From initial registration through DISCOM feasibility, installation, inspection, net metering, and the final DBT credit, vendors put the usual end-to-end timeline at six to twelve weeks in most states.
DISCOM inspection scheduling accounts for much of the variation. Gujarat, Maharashtra, and Rajasthan tend to be toward the quicker end, while states with heavier net-metering backlogs can take longer.
Financing Options and PM Surya Ghar Solar Loans
Government-Backed Low-Interest Rooftop Solar Loans
Because the subsidy arrives only after commissioning, not before, most households have to pay the full system cost upfront and recover the subsidy later. To cover that gap, twelve public sector banks offer collateral-free solar loans tied to the scheme through the Jan Samarth platform.
Rates generally range from about 5.75 percent for smaller loans to around 7.9 percent for larger ones, depending on the bank, loan amount, and tenor. SBI’s Surya Ghar product, for example, offers loans up to ₹2 lakh at 5.75 percent without collateral, while loans between ₹2 lakh and ₹6 lakh carry a 7.90 percent rate, with tenures of up to 15 years.
Lower-income households installing through the scheme’s Utility Led Aggregation model, including PMAY, BPL, and SC/ST beneficiaries, have accessed concessional loans at around 5.75 percent. More than 21 lakh such loans had been sanctioned by August 2026.
Exploring Partner Banks and NBFC Financing Schemes
Beyond SBI, Canara Bank and Union Bank of India have their own loan products for the scheme. HDFC and ICICI are generally quicker to approve applications where faster disbursal is needed.0
Loan rates and terms can change with the RBI repo rate, so check the lender’s current terms rather than relying on a figure quoted months earlier. For households that cannot pay the full amount upfront, one common route is to borrow for the entire system cost, complete the installation and commissioning, and then put the subsidy, which arrives roughly one to one and a half months later, toward the loan principal. The source states that there is no prepayment penalty for doing so.
Calculating Your Return on Investment (ROI) and Break-Even Period
After the subsidy, a 1 kW system in Tamil Nadu typically costs around ₹30,000 to ₹40,000 out of pocket. A 2 kW system comes to about ₹60,000 to ₹80,000, while a 3 kW system costs around ₹65,000 to ₹1,20,000. Before the scheme, those system costs were roughly twice as high.
A typical 3 kW system produces about 360 to 400 units a month, which can cover most of the electricity bill for an urban household. Net metering income for a typical 3 kW household system is estimated at roughly ₹17,000 to ₹18,000 a year according to government projections cited in the scheme documentation. With bill savings and export income taken together, most systems recover their net cost within three to six years. After that, the panels can continue producing power for another twenty-plus years, with module warranties running for 25 to 30 years. The subsidy itself is not treated as taxable income under the current Income Tax Act provisions.
Post-Installation Maintenance and Performance Tracking
Monitoring Daily Solar Energy Generation via the Portal
Once the system is commissioned, generation data usually moves from the inverter to the national portal automatically. OEM inverters registered under the scheme have to report through an API integration mnre.gov.in/en/notice/guidelines-for-pm-surya-ghar-muft-bijli-yojana/. Most households check their daily and monthly generation either on the portal itself or through the inverter manufacturer’s app.
Routine Cleaning and Panel Maintenance Best Practices
Dust, pollen, and bird droppings can reduce panel output if they build up over several weeks. A plain-water wash every couple of weeks usually keeps generation close to the rated output. After a dry spell, or in an area with a lot of construction dust, the panels may need cleaning more often. Housing societies generally set aside a small amount from the maintenance fund for a cleaning contract on shared arrays every two weeks. Apart from cleaning, a periodic visual check is usually enough for a residential system. Look for loose mounting, a leaking gland where cables enter the roof, or a damaged cable.
Understanding Warranty Guidelines for Solar Inverters and Modules
Registered vendors have to provide five years of free repair and upkeep from the date of commissioning. If a panel underperforms during that period, the vendor has to replace it at no cost mnre.gov.in/en/notice/guidelines-for-pm-surya-ghar-muft-bijli-yojana/. That cover comes on top of the manufacturer’s own warranties.
Manufacturing and workmanship warranties are typically at least 5 years, while some of the stronger modules on the market offer 25 to 30 years of performance warranty mnre.gov.in/en/notice/guidelines-for-pm-surya-ghar-muft-bijli-yojana. Inverters generally have a shorter warranty, often 5 years as standard, with paid extensions available. The inverter is also the component most likely to need replacement before the panels themselves.
| Common Application Rejection Reasons and Solutions | ||
| Rejection Reason | Fix | |
| Bank account not Aadhaar-seeded | Link Aadhaar to the account at a branch, via the bank app, or the NPCI portal, before DISCOM inspection | |
| Name mismatch between Aadhaar and electricity bill | Correct the bill name at the DISCOM office before applying, not after | |
| Wrong consumer number entered | Re-check against the physical bill; it is not the meter serial number | |
| Pending electricity dues | Clear arrears and get a no-dues certificate before applying | |
| Non-empanelled vendor or non-ALMM panels | Confirm vendor registration and current ALMM listing before signing | |
| System size exceeds sanctioned load | File a load enhancement request with the DISCOM first | |
| Blurry or incomplete document uploads | Re-photograph in good light against a plain background | |
| Missing housing society NOC | Pass a general body resolution and secure the NOC before applying | |
FAQ: How to register for PM Surya Ghar Muft Bijli Yojana
The PM Surya Ghar Muft Bijli Yojana is a central government scheme launched to provide up to 300 units of free electricity per month. It offers financial assistance through a direct subsidy for installing grid-connected rooftop solar panels on residential homes.
The scheme provides ₹30,000 for a 1 kW system, ₹60,000 for a 2 kW system, and a maximum capped subsidy of ₹78,000 for systems 3 kW and above. Depending on your location, you may also qualify for additional state-level top-up subsidies.
You are eligible if you are an Indian citizen with a residential property and a valid electricity connection in your name. The applicant must have an Aadhaar-linked bank account (NPCI mapped) for the Direct Benefit Transfer (DBT) and a shadow-free rooftop. Commercial and industrial connections do not qualify.
A tenant cannot apply independently. You must obtain a No-Objection Certificate (NOC) from the landlord, and the application is typically processed jointly, as the central subsidy must align with the name registered on the electricity meter.
Applicants can access collateral-free rooftop solar loans through the Jan Samarth portal. Major partner banks like SBI, Canara Bank, and Union Bank offer low-interest financing, typically ranging from 5.75% to 7.9%, specifically for this initiative.
Top reasons for application rejection include name mismatches between Aadhaar and electricity bills, using a non-empanelled DISCOM vendor, failing to link your bank account to Aadhaar, or installing non-ALMM compliant solar panels.
Resolving Aadhaar and Bank Account NPCI Linkage Failures
A bank account that has not been seeded with Aadhaar through NPCI cannot receive a DBT payment, regardless of whether everything else in the application is in order. The applicant can fix this by visiting the bank branch or checking the linkage through the bank’s mobile app or the NPCI portal. Doing it before the DISCOM inspection avoids a payment delay later.
Fixing Name Mismatches on Electricity Bills and Bank Records
If the Aadhaar name and electricity bill name differ, even slightly, the correction has to be made through the DISCOM’s name correction process, not through the solar portal. This includes differences such as initials against a full name, an old spelling, or a maiden name that is still on the account. Make the correction before applying. If the application is rejected and submitted again, the review process starts over.
Correcting Uploaded Document Errors and Blurry Images
The DISCOM’s manual reviewers and the portal’s own checks can reject scans when the text is difficult to read. Incomplete documentation can also hold up a claim, including missing commissioning photographs, an absent equipment certificate number, or an unfinished project completion report. A simple fix is to photograph the documents in good light against a plain background instead of submitting a poor-quality copy.
Handling Delays in Housing Society NOC Approvals
For apartment and housing society applications, a missing or incomplete no-objection certificate from the managing committee can hold everything up. The DISCOM will not approve a shared meter connection without documented authority from the society. Getting the resolution passed at a general body meeting before the vendor is finalised keeps the NOC from becoming the point where an otherwise ready application gets stuck.
Disclaimer
The information provided in this article regarding the PM Surya Ghar Muft Bijli Yojana is for general informational and educational purposes only. While we strive to ensure the content is accurate and current, we make no express or implied warranties or representations regarding the completeness, reliability, or accuracy of the subsidy details, eligibility criteria, or registration processes mentioned.
Government policies, subsidy tier amounts, and DISCOM regulations are subject to frequent revisions without prior notice. We are an independent entity and are not affiliated, associated, authorized, endorsed by, or in any way officially connected with the Ministry of New and Renewable Energy (MNRE), the Government of India, or any local state electricity distribution companies.
Any reliance you place on this material is strictly at your own risk. Readers are strongly advised to independently verify all details through the official national portal (pmsuryaghar.gov.in) and consult authorized nodal agencies before making financial or installation commitments.




Leave a Reply