Stuck Passport Application? How to Escalate Through the PG Portal for Real Results
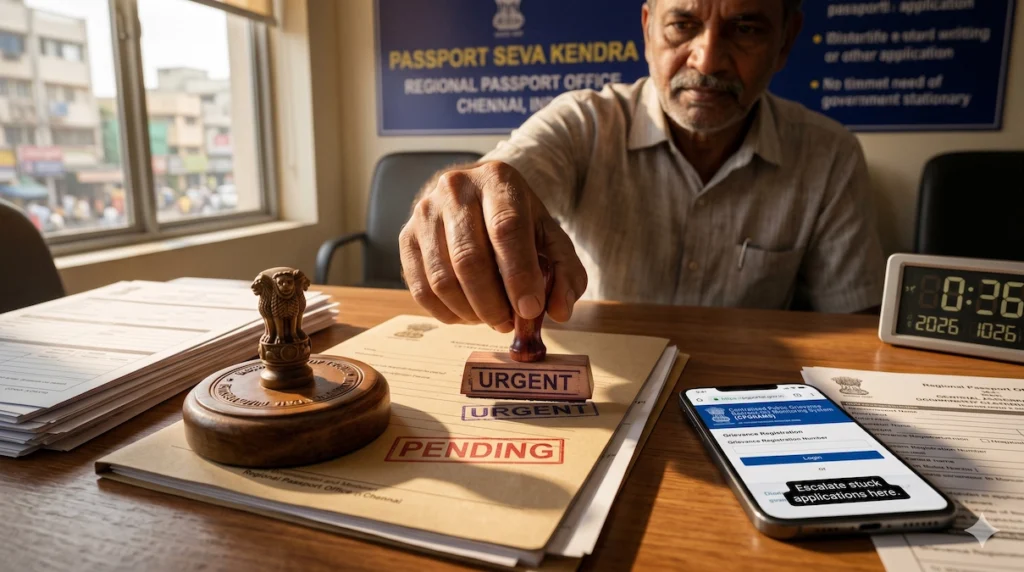
Getting a passport should be straightforward. You submit the application, attend your Passport Seva Kendra appointment, pay the required fee, and wait for the process to run its course. But many applicants face a stuck passport application.
Weeks go by. Sometimes months. You keep checking the Passport Seva portal only to see the same status staring back at you: “Pending for Police Verification” or “Under Review at RPO.” No clear explanation. No realistic timeline. And when you try to get answers, you often find yourself going in circles.
If that sounds familiar, you’re far from the only person dealing with it. Every year, India’s passport system handles millions of applications, and delays can happen at several stages. Police verification bottlenecks, Regional Passport Office backlogs, document discrepancies, and administrative reviews are all common reasons applications end up stuck in limbo.
The encouraging part is that you do not have to wait indefinitely and hope someone notices your case. There is a formal escalation mechanism designed specifically for situations like this: the Public Grievances Portal, better known as CPGRAMS (Centralised Public Grievance Redress and Monitoring System).
This guide walks you through the entire process. You’ll learn why passport applications get delayed, what common status messages actually mean, which steps you should take before escalating, and how to file an effective grievance through the PG Portal that has the best chance of getting your case reviewed and moved forward.
At A Glance: Escalating A Stuck Passport Application
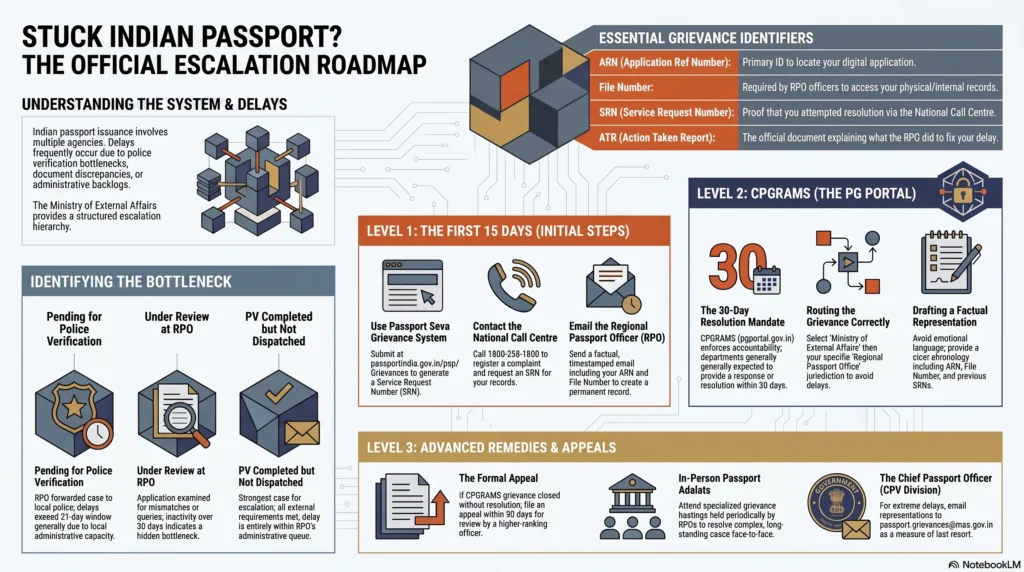
- Common Causes for Delay: Most passport applications stall due to pending police verification reports (PVR), document discrepancies, data mismatches, or administrative backlogs at the Regional Passport Office (RPO).
- Mandatory First Steps: Before using external portals, you must attempt resolution through the Passport Seva Grievance System, contact the National Call Centre (1800-258-1800), or email your RPO. Wait at least 15 working days before escalating further.
- The PG Portal (CPGRAMS) Solution: If official Passport Seva channels fail, escalate your case via the PG Portal (pgportal.gov.in). This centralized government system enforces accountability and strict response timelines.
- Filing a Strong Grievance: Ensure you route the complaint correctly by selecting the Ministry of External Affairs and your specific RPO. Always include exact, factual details like your Application Reference Number (ARN), File Number, and previous Service Request Numbers (SRNs).
- Tracking and Appeals: Save your unique grievance registration number to track progress. If the department closes your case with an unsatisfactory Action Taken Report (ATR), use the portal’s mechanism to file a formal appeal within 30 days.
- In-Person Alternatives: For exceptionally delayed or complex files, bypass the digital queue by booking a specific RPO enquiry appointment, visiting an Information Facilitation Centre (IFC), or attending a local Passport Adalat.
- Measures of Last Resort: If all else fails, extreme delays can be escalated to the Chief Passport Officer (CPV Division), the Directorate of Public Grievances (DPG), or through formal legal recourse via the High Court.
While some of these issues are resolved quickly, others can leave an application sitting in the same status for weeks unless the applicant actively follows up.
The Role of Police Verification in Application Hold-Ups
If there is one stage where passport applications most frequently get stuck, it is police verification.
After your PSK appointment, the Passport Seva system forwards a verification request to the relevant police authorities. A local officer is assigned to conduct a field verification, confirm your residential address, gather required information, and submit a Police Verification Report (PVR). The report is typically marked as Clear, Adverse, or Pending.
The challenge is that applicants have very little visibility into what is happening on the police side. While you can track your passport application through Passport Seva, you generally cannot see the internal progress of the verification process itself.
This lack of transparency often creates frustration. A report may be awaiting officer approval, sitting at a district office, or under review for reasons that never appear on the passport portal. If the report is marked adverse, the RPO must examine the findings before making a decision, which can add further delays.
Some state police departments provide online services or contact information through their official portals, including Delhi Police, Maharashtra Police and Uttar Pradesh Police. Depending on the state, these channels may help applicants obtain updates or raise enquiries directly. Availability and responsiveness, however, vary considerably.
Also Read: India’s New Labour Codes Explained: Key Rules and Impact
Document Discrepancies and Regional Passport Office (RPO) Queries
Not every delay originates with police verification. In many cases, the application is held up because the Regional Passport Office needs clarification or additional documentation.
The official process requires the RPO to notify applicants when discrepancies are found. In practice, however, communication is not always consistent. Many applicants discover months later that their file was waiting for a clarification they never knew had been requested.
Common examples include:
- Differences between names appearing on Aadhaar, educational certificates, and other identity documents.
- Variations in residential addresses across submitted records.
- Questions relating to employment history or previous places of residence.
- Missing supporting documents for name changes, reissues, or special-category applications.
Even a relatively minor mismatch can prevent a file from moving forward until an officer reviews and resolves the issue.
Technical Glitches and Payment Failures on the Passport Seva Website
Although less common than verification or documentation issues, technical problems can also cause significant delays.
Applicants occasionally encounter payment gateway failures on the Passport Seva portal. In some situations, the payment amount is debited from the bank account but is not properly reflected in the Passport Seva system. This can leave the application in an uncertain state that requires manual intervention.
Document upload failures present another challenge. An upload may appear successful from the applicant’s perspective while the system records an incomplete submission behind the scenes. Since these issues are not always flagged immediately, applicants may only discover them after noticing prolonged inactivity on their application.
When a technical issue is responsible for the delay, the first step is usually to contact the Passport Seva helpdesk and create a documented service request. Escalation through CPGRAMS generally becomes relevant only after these primary support channels have been exhausted.
Decoding Your Passport Seva Application Status
One of the most frustrating aspects of a delayed passport application is trying to figure out what the status updates actually mean. The messages displayed on the Passport Seva portal are often brief, generic, and lacking context. As a result, applicants are left wondering whether their case is progressing normally or sitting idle somewhere in the system.
Understanding what each status represents can help you determine when patience is appropriate and when it is time to escalate.
What “Pending for Police Verification” Actually Means
When your application shows “Pending for Police Verification,” it means your appointment and document processing at the PSK have been completed successfully, and the Regional Passport Office has forwarded your case to the police for verification.
At this stage, responsibility largely shifts away from the passport office and into the hands of the local police authorities. A verification request has been generated, but the completion timeline depends heavily on how quickly the assigned officers process and submit their report.
The reality is that this status can remain unchanged for vastly different lengths of time. For some applicants, verification is completed within days. For others, it can drag on for weeks or even months.
The standard expectation is:
- Normal applications: Police verification should generally be completed within 21 days of the PSK appointment.
- Tatkal applications with pre-verification: Verification is expected much faster, often within a day.
If your status remains unchanged beyond 30 days, especially without any communication from either the police department or the RPO, you have reasonable grounds to begin escalation efforts.
Resolving “Passport Application Under Review at RPO”
The status “Under Review at RPO” indicates that your application is currently being examined by the Regional Passport Office.
This review may occur before police verification begins or after the police report has been received. During this stage, officers assess your submitted documents, verification findings, and any issues that may require clarification before approval.
For a straightforward application with no complications, this review phase should usually be relatively brief.
When the status remains unchanged for more than 30 days, however, it often points to one of several possibilities:
- An internal query has been raised but not communicated to you.
- The police verification report contains observations requiring further review.
- Your application is caught in an administrative backlog.
- Additional documentation is needed but has not been formally requested.
Regardless of the cause, a prolonged review period without explanation is generally a valid reason to seek clarification through formal grievance channels.
Why It Shows “Police Verification Completed But Passport Not Dispatched”
This particular status can be especially confusing because it suggests that the hardest part of the process is already finished.
If police verification has been completed and accepted, most applicants naturally expect the passport to move quickly into printing and dispatch. When that does not happen, it often signals that the application is waiting at the final approval stage within the RPO.
Possible reasons include:
- Pending officer review.
- Internal administrative checks.
- Technical issues affecting printing queues.
- Requests for clarification that have not yet been communicated.
From an applicant’s perspective, this is one of the strongest cases for escalation. At this point, you have attended your appointment, submitted your documents, and completed verification requirements. The remaining delay exists entirely within the passport administration process.
If this status remains unchanged for an extended period, filing a formal grievance is usually justified.
Understanding “Printed and Sent for Dispatch” Delays
Seeing “Printed and Sent for Dispatch” often feels like crossing the finish line, but occasionally delays can still occur after this update appears.
Once the passport has been printed, it is handed over to India Post for delivery through Speed Post. In most cases, delivery follows shortly afterward.
However, delays may arise because of:
- Postal network disruptions.
- Remote or difficult-to-service delivery locations.
- Incorrect address details.
- Failed delivery attempts when the recipient is unavailable.
- Local sorting or transportation bottlenecks.
Unlike earlier stages of the passport process, these delays are generally not resolved through CPGRAMS. Instead, applicants should monitor the Speed Post tracking information, contact India Post directly if necessary, and coordinate with the RPO if alternative delivery arrangements or collection options are required.
The key takeaway is simple: not every status update requires the same response. Some indicate that your application is waiting on external verification, while others suggest an issue within the passport system itself. Knowing the difference helps you choose the right escalation path and avoid wasting time pursuing the wrong office or department.
Also Read: Salary Payment Rules India 2026: 7th Day & 50% Wage Explained
First-Level Escalation: Mandatory Steps Before Using the PG Portal
A common mistake many applicants make is jumping straight to CPGRAMS the moment their passport application appears delayed. While that can be tempting, it is usually more effective to treat the PG Portal as a formal escalation step rather than your first move.
Before filing a grievance on CPGRAMS, take the time to work through the available Passport Seva channels and keep records of every interaction. These records can significantly strengthen your case later if you need to escalate further.
Think of it this way: the more clearly you can demonstrate that you’ve already tried the standard resolution routes, the harder it becomes for officials to dismiss your grievance with a generic response.
Checking Your Exact Application Status on Passport Seva
Start by logging into your account at https://www.passportindia.gov.in and opening the “Track Application Status” section.
Pay close attention to:
- The exact status message displayed.
- The date of the last update.
- Your Application Reference Number (ARN).
- Your file number.
Many applicants simply note that their application is “stuck,” but when filing complaints or speaking with officials, specifics matter. A status that has remained unchanged for 15, 20, or 30 days carries far more weight when you can clearly document it.
If there has been no movement for over two weeks and you have received no communication from the RPO or police authorities, it is reasonable to begin raising concerns.
Logging a Complaint Using the Passport Seva Grievance System
Before escalating outside the Passport Seva ecosystem, use the grievance mechanism already built into the platform.
Visit:
https://www.passportindia.gov.in/psp/Grievances
From there, submit a grievance describing the issue, including the length of the delay and your current application status. Once submitted, the system generates a Service Request Number (SRN).
Do not ignore this number.
Save it, take a screenshot, and keep a copy of any confirmation emails you receive. The SRN serves as proof that you attempted to resolve the issue through the official Passport Seva channel before seeking intervention elsewhere.
According to the Ministry’s grievance redressal guidance, grievances submitted through this system are routed to the relevant Regional Passport Office and are expected to receive a response within approximately 15 working days.
Escalating via the National Call Centre (1800-258-1800)
The Passport Seva National Call Centre operates around the clock and supports multiple languages, making it one of the easiest escalation channels available.
Call:
1800-258-1800
When speaking with the representative:
- Explain your situation clearly.
- Ask whether there are any internal notes or updates on your application.
- Request that a complaint be registered if the delay exceeds normal timelines.
- Most importantly, ask for the Service Request Number (SRN) associated with your complaint.
While the call centre cannot force an RPO officer or police department to act, it creates another documented record showing that you attempted to resolve the issue through official channels. That documentation becomes useful later if you need to escalate through CPGRAMS.
[H3] When and How to Email Your Specific Regional Passport Officer (RPO)
Many applicants underestimate the value of a well-written email.
Unlike phone calls, emails create a permanent, timestamped record that can be referenced later. If your case has been pending for an unusually long period, sending a formal email to your Regional Passport Office is often worthwhile.
You can find RPO contact details through the Passport Seva website at:
Your email should include:
- Full name.
- Date of birth.
- ARN.
- File number.
- Date of PSK appointment.
- Current application status.
- A concise explanation of the delay.
Keep the tone professional and factual. Avoid lengthy emotional explanations. The goal is to obtain a written response or at least create evidence that you attempted direct communication.
If no response arrives within seven working days, that silence itself becomes relevant information you can mention in a future CPGRAMS complaint.
For applicants dealing with passport matters outside India, the Ministry of External Affairs also provides a dedicated consular grievance platform.
The 15-Day Rule: Knowing When It Is Time to Move to CPGRAMS
There comes a point when waiting longer serves little purpose.
As a practical rule, if you have already:
- Filed a grievance through Passport Seva,
- Contacted the National Call Centre,
- Attempted communication with the relevant RPO,
and 15 working days pass without a meaningful response, it is usually time to move to CPGRAMS.
The important distinction here is between a genuine response and a generic acknowledgement. An automated message saying your complaint has been received is not a resolution. What you need is an actual update explaining the reason for the delay and what steps are being taken to address it.
When that does not happen, CPGRAMS becomes the appropriate next step because you can demonstrate that you followed the established process before seeking higher-level intervention.
By the time you file your PG Portal grievance, you should ideally have a small but organized collection of evidence: screenshots of application status updates, grievance reference numbers, complaint acknowledgements, call records, and email correspondence. These documents can make the difference between a routine complaint and one that receives serious attention.
What is the PG Portal (CPGRAMS) and How Does It Work?
If you’ve already tried the Passport Seva grievance system, contacted the call centre, and followed up with your Regional Passport Office without getting anywhere, the next logical step is CPGRAMS.
For many applicants, this is the point where things finally start moving.
The reason is simple: CPGRAMS introduces a layer of accountability that doesn’t exist when you’re repeatedly contacting the same office that’s already handling your file. Instead of asking for an update within the passport system, you’re formally escalating the issue through the Government of India’s central grievance mechanism.
An Overview of the Centralized Public Grievance Redress and Monitoring System
CPGRAMS, short for the Centralised Public Grievance Redress and Monitoring System, is the Government of India’s official platform for lodging complaints against central government ministries, departments, and many state government bodies.
The portal is available at:
It is administered by the Department of Administrative Reforms and Public Grievances (DARPG) under the Ministry of Personnel, Public Grievances and Pensions.
Rather than operating as a ministry-specific complaint desk, CPGRAMS serves as a centralised platform where citizens can escalate unresolved issues across government departments. Passport-related complaints fall squarely within its scope because passport services are administered by the Ministry of External Affairs.
According to data published by DARPG in its occasional paper, the platform handles millions of grievances every year and connects citizens with an extensive network of grievance officers across government departments.
Why CPGRAMS is Highly Effective for Bureaucratic Delays
Many government complaint systems struggle because complaints remain within the same chain of command that created the problem in the first place.
CPGRAMS works differently.
When you submit a grievance through the PG Portal, your complaint enters a monitored framework with defined timelines, designated officers, and escalation pathways. That structure creates pressure for action in a way that routine emails and phone calls often cannot.
Several factors contribute to its effectiveness:
- The complaint is formally tracked and assigned.
- Designated grievance officers are responsible for responding.
- Resolution timelines are monitored.
- Delayed cases can trigger further escalation.
- Citizens can challenge unsatisfactory resolutions through an appeal process.
Another important difference is visibility. Ministries know that grievance disposal rates are monitored and reported. That doesn’t guarantee an immediate resolution, but it does mean complaints are far less likely to disappear into a bureaucratic void.
As noted in the RTI Wiki’s 2026 guide to CPGRAMS, a significant proportion of grievances are closed within the prescribed timeline, although applicants should still review closure reports carefully to ensure the issue was genuinely addressed.
Who Should Use the PG Portal for Passport Issues?
CPGRAMS is best suited for applicants who have already attempted normal resolution channels and still have no meaningful progress.
You should strongly consider using the PG Portal if:
- Your passport application has been stuck at the police verification stage for more than 30 working days.
- Your file has remained under review at the RPO for an unusually long period.
- Police verification has been completed, but the passport is still not being issued or dispatched.
- Passport Seva grievances have been closed without resolving the underlying issue.
- You keep receiving repeated requests for documents you’ve already submitted.
- A Tatkal application has lost its priority status without explanation.
In short, CPGRAMS is designed for situations where the standard process has stalled and ordinary follow-ups are no longer producing results.
The Chain of Command: Where Your Grievance Actually Goes
One of the most common misconceptions about CPGRAMS is that complaints disappear into another anonymous government portal.
In reality, grievances are routed to specific officials.
When you file a passport-related complaint through CPGRAMS, the system directs it to the appropriate authority within the Ministry of External Affairs based on the jurisdiction and office involved. For most passport cases, that means the grievance reaches officers connected to the relevant Regional Passport Office or the Consular, Passport and Visa (CPV) Division.
This routing process matters because it places your complaint before officials whose role includes grievance resolution rather than routine application processing.
The CPGRAMS FAQ explains that every ministry designates senior officers to oversee grievance handling. These officers are responsible for ensuring complaints receive attention and responses within prescribed timelines.
That additional oversight is often what makes the difference between another unanswered follow-up and a meaningful review of your case.
Expected Resolution Timelines and Government Accountability
One of the strongest features of CPGRAMS is that it operates within a defined timeframe.
According to the CPGRAMS FAQ, grievances are expected to receive a response within 30 days. If the matter cannot be resolved during that period, the responsible office is expected to provide an interim update explaining the delay.
For applicants dealing with a passport file that has already been stuck for months, this requirement alone can be valuable. Even when the issue is not resolved immediately, obtaining a clear explanation often provides more insight than weeks of checking the Passport Seva portal with no visible progress.
The broader system is overseen by DARPG. Through regular monitoring and performance reviews, the department helps ensure ministries remain accountable for handling citizen grievances in a timely manner.
That accountability is the real strength of CPGRAMS. It transforms a passive request for information into a formal grievance with a tracking number, assigned responsibility, and a documented expectation that someone must respond. For applicants facing unexplained passport delays, that shift can be surprisingly powerful.
Step-by-Step Guide: How to Escalate Your Passport Issue on the PG Portal
Once you’ve exhausted the standard Passport Seva channels and gathered the necessary documentation, it’s time to file your grievance through CPGRAMS. The process itself is straightforward, but the details matter. A correctly filed complaint reaches the right office faster and is far more likely to receive a meaningful response.
Let’s walk through each step.
Registering as a New Citizen User on pgportal.gov.in
Start by visiting:
If you’ve never used the portal before, click “Lodge Public Grievance” and then select the registration option available on the login page.
You’ll be asked to provide basic information, including:
- Full name
- Mobile number
- Email address
- Residential address
- Captcha verification
After submitting your details, you’ll receive an OTP on your registered mobile number. Once verified, the system will create your account and send login details to your email address.
The entire registration process usually takes only a few minutes. Before moving forward, make sure your email address and phone number are active because all future updates regarding your grievance will be sent through these channels.
Navigating the Dashboard and Selecting “Lodge Public Grievance”
After logging in, you’ll arrive at the citizen dashboard.
From here, select “Lodge Public Grievance.”
This opens the complaint submission form where you’ll enter all details related to your passport issue.
Before proceeding, it’s worth spending a minute reviewing the portal’s terms and conditions. They explain which matters can be handled through CPGRAMS and which fall outside its scope. Passport delays, police verification bottlenecks, and unresolved RPO issues are all legitimate grievance categories.
If you need help understanding the interface, you can go through the official CPGRAMS Help document.
Selecting the Correct Ministry (Ministry of External Affairs)
This step is more important than many applicants realise.
In the Ministry/Department dropdown menu, select:
Ministry of External Affairs
Since passport services fall under the Ministry of External Affairs, choosing any other ministry can result in unnecessary transfers and delays.
When prompted for the department or division, select the passport-related option available, typically Consular Passport and Visa Division (CPV Division) or the closest equivalent shown on the portal.
A surprisingly large number of grievances lose time simply because they are filed under the wrong ministry. Taking a few extra seconds here can save weeks later.
Choosing the Right Subordinate Office (Your Specific RPO Jurisdiction)
After selecting the ministry, you’ll usually be asked to choose the relevant subordinate office.
This is where you should select the Regional Passport Office (RPO) responsible for your jurisdiction.
Examples include:
- RPO Chennai
- RPO Mumbai
- RPO Delhi
- RPO Bengaluru
Many applicants assume they should choose the city where they attended their Passport Seva Kendra appointment. That’s not always correct.
The safer approach is to select the RPO responsible for your residential jurisdiction and passport file. If you’re unsure, check your application records or verify which RPO currently has authority over your case.
Selecting the wrong office can cause the grievance to be rerouted internally, adding unnecessary delays before anyone actually reviews it.
Filling Out Your Personal and Contact Details Accurately
When entering your personal information, consistency is critical.
Use the same details that appear on your passport application, including:
- Full name
- Date of birth
- Residential address
- PIN code
- Mobile number
- Email address
Even small inconsistencies can create avoidable confusion during verification.
For example, if your passport application contains one address and your CPGRAMS complaint contains a significantly different one, the reviewing officer may need additional time to confirm that both records belong to the same applicant.
The goal is to make it as easy as possible for the officer reviewing your grievance to locate your file and understand your situation without having to resolve avoidable discrepancies first.
By the time you’ve completed these steps, your complaint is correctly routed and ready for what matters most: the grievance description itself. The quality of that description often determines whether you receive a generic response or a meaningful intervention on your case.
Drafting a Powerful and Factual PG Portal Grievance
The success of a CPGRAMS complaint often comes down to one thing: clarity.
Many applicants assume that expressing frustration will help their case. It’s understandable. By the time someone reaches the PG Portal, they’ve usually spent weeks or months chasing updates, making calls, and checking the same status page over and over. But the most effective grievances are not the most emotional ones. They’re the ones that make it easy for an officer to quickly understand the problem, verify the facts, and take action.
Your objective is simple: present a clear timeline, demonstrate that you’ve already followed the standard channels, and explain exactly what outcome you’re seeking.
Keeping the Tone Formal, Respectful, and Objective
A CPGRAMS grievance should read like a professional representation, not a complaint written in anger.
Remember, the officer reviewing your case may know nothing about your situation beyond what you’ve written in the form. If your description is overly emotional, repetitive, or difficult to follow, there’s a greater chance you’ll receive a generic response.
Instead, focus on facts.
State what happened, when it happened, and what remains unresolved.
As noted in the RTI Wiki’s practical guide on passport escalations, the goal is to help the reviewer understand the issue quickly and identify the specific remedy you’re requesting. A concise, well-organized complaint makes that much easier.
Think of your grievance as a case summary rather than a personal story.
Essential Details to Include (ARN, File Number, Dates, PSK Location)
Before drafting your grievance, gather all the information you’ll need.
Every passport-related complaint should include the following details:
| Detail | Why It Matters |
| Application Reference Number (ARN) | The primary identifier used to locate your application |
| File Number | Required by the RPO to access your case records |
| Date of PSK Appointment | Establishes when processing officially began |
| PSK / POPSK Location | Identifies the submission centre |
| Current Application Status | Shows where the application is currently stuck |
| Previous Grievance SRN | Demonstrates prior escalation attempts |
| Date of Last Status Update | Helps quantify the length of the delay |
Providing these details upfront saves time and reduces the chances of receiving a response asking for basic information that could have been included from the start.
Structuring Your Complaint for Maximum Clarity
A well-structured grievance is easier to review and act upon.
Rather than writing one long block of text, organize the complaint into distinct sections.
A practical structure looks like this:
Opening Statement
Briefly explain the issue.
Example:
“I am seeking intervention regarding a passport application that has remained pending beyond the standard processing timeline.”
Timeline of Events
List the key milestones:
- Application submitted
- PSK appointment attended
- Current status
- Duration of inactivity
Previous Escalation Attempts
Mention any:
- Passport Seva grievances
- Service Request Numbers (SRNs)
- National Call Centre complaints
- Emails sent to the RPO
Relief Requested
Clearly state what you want.
For example:
- A written explanation of the delay
- Completion of police verification
- Processing of the pending application
- Clarification regarding missing documents
The easier it is for an officer to identify the requested action, the more likely your complaint is to move forward efficiently.
Uploading the Right Supporting Documents (Application Receipts, ID Proofs)
A strong grievance is supported by evidence.
CPGRAMS allows applicants to upload supporting files, and using that feature properly can significantly strengthen your submission.
Useful documents include:
- A screenshot showing the current Passport Seva application status.
- The PSK appointment acknowledgement receipt.
- Copies or screenshots of earlier Passport Seva grievances.
- Evidence of previous SRNs generated through the call centre.
- Relevant email correspondence with the RPO.
Focus on documents that help establish the timeline and demonstrate previous attempts to resolve the issue.
When uploading files, make sure sensitive information is handled carefully. If possible, mask unnecessary Aadhaar or PAN digits unless their inclusion is specifically required for verification purposes.
Template for a CPGRAMS Passport Complaint
Below is a practical template you can adapt to your own situation.
Subject: Passport Application Stuck for [X] Days – Requesting Immediate Action (ARN: [ARN NUMBER])
Grievance Description:
I am writing to request intervention regarding my passport application, which has remained pending without resolution for the past [NUMBER] days.
Application Details:
- Name: [FULL NAME AS ON APPLICATION]
- Date of Birth: [DOB]
- Application Reference Number (ARN): [ARN]
- File Number: [FILE NUMBER]
- PSK Location: [PSK/POPSK NAME AND CITY]
- Date of PSK Appointment: [DATE]
- Current Status on Passport Seva Portal: [STATUS TEXT]
- Date of Last Status Change: [DATE]
Chronology:
I submitted my passport application on [DATE] and attended my PSK appointment on [DATE]. My application status has remained “[STATUS]” since [DATE], with no meaningful update for [X] days.
Previous Escalation Attempts:
I filed a grievance through the Passport Seva portal on [DATE] under SRN [SRN NUMBER]. Despite this, the issue remains unresolved and I have not received a substantive update regarding the cause of the delay.
Relief Requested:
I respectfully request:
- A written explanation of the reason for the delay.
- Immediate review of the pending stage of processing.
- Necessary action to complete the application and issue the passport at the earliest possible date.
Attachments:
- PSK Appointment Acknowledgement
- Current Application Status Screenshot
- Previous Grievance Records (if applicable)
A complaint written in this format does not leave much room for ambiguity. It tells the reviewing officer exactly what happened, what has already been done, and what action you’re requesting next. That clarity can make a significant difference when your grievance lands on someone’s desk for review.
Tracking, Following Up, and Escalating Further
Filing a CPGRAMS grievance is not the final step. In many cases, it’s the beginning of a more structured process. What you do after submitting the complaint can be just as important as the complaint itself.
A surprising number of applicants file a grievance, receive a generic response weeks later, and assume there’s nothing more they can do. In reality, CPGRAMS includes tracking, feedback, and appeal mechanisms that allow you to push back when a case has not genuinely been resolved.
Generating and Saving Your Grievance Registration Number
As soon as your grievance is submitted, CPGRAMS generates a unique registration number.
Treat this number like you would an application reference number or a ticket number from a government office. It’s the primary identifier for your complaint and will be required for every future interaction related to the grievance.
The RTI Wiki’s CPGRAMS guide notes that grievance registrations typically follow a unique alphanumeric format, allowing complaints to be tracked throughout their lifecycle.
Once you receive the number:
- Take a screenshot of the confirmation page.
- Save any confirmation emails.
- Store the registration number somewhere easily accessible.
- Keep it alongside your ARN, file number, and SRN records.
Having all these references in one place makes future follow-ups much easier.
How to Check Your CPGRAMS Grievance Status Online
After submission, you can monitor the progress of your complaint directly through the PG Portal.
Visit:
Log in and navigate to the “View Status” section.
From there, you’ll be able to see:
- The current status of the grievance.
- The office handling the complaint.
- Remarks entered by the reviewing officer.
- Action Taken Reports (ATRs).
- The date of the latest update.
Checking periodically is worthwhile, but there’s usually little value in refreshing the page every day. Government offices often take time to review records, communicate internally, and update the system.
Applicants who prefer mobile access can also track their grievances through the UMANG platform.
Interpreting the Interim and Final Action Taken Reports (ATR)
One of the most valuable features of CPGRAMS is the Action Taken Report, commonly referred to as the ATR.
The ATR explains what the department actually did in response to your complaint.
You’ll commonly encounter statuses such as:
| Status | Meaning |
| Submitted | Complaint has been registered |
| Under Examination | Assigned to an officer and under review |
| Action Initiated | Steps are being taken to address the issue |
| Resolved / Closed | The department considers the matter resolved |
| Sent to Another Department | The grievance has been transferred |
The important thing to remember is that the status label alone does not tell the whole story.
Always read the accompanying remarks carefully.
A useful ATR might say something like:
“Police verification report received and found clear. Passport approved and dispatched on [date].”
A less useful response might simply state:
“Matter under process.”
The first provides specific information and demonstrates action. The second offers little clarity and may indicate that the underlying issue remains unresolved.
What to Do if Your Grievance is Closed Without a Satisfactory Resolution
One of the most common frustrations applicants encounter is seeing their complaint marked as “Resolved” even though the underlying issue still exists.
If that happens, don’t assume the process is over.
The CPGRAMS FAQ explains that citizens can continue pursuing the matter when a closure is unsatisfactory. Modern CPGRAMS workflows also include a feedback and appeal mechanism specifically for this purpose.
When your grievance is closed:
- Read the Action Taken Report carefully.
- Assess whether the actual issue has been resolved.
- Submit honest feedback through the portal.
- Avoid selecting a positive rating simply because a response was received.
A response is not the same thing as a resolution.
If your passport remains stuck and the department has not adequately addressed the issue, indicate that clearly in your feedback.
Filing a Formal Appeal on the PG Portal
If you’re dissatisfied with the outcome, the next step is to file an appeal.
The appeal process allows your grievance to be reviewed by a higher authority than the officer who handled the original complaint.
To initiate an appeal:
- Open the grievance record.
- Select the “File Appeal” option.
- Explain briefly why the previous resolution was inadequate.
- Reference the grievance registration number and closure details.
- State the specific action that remains pending.
There’s no need to rewrite your entire complaint from scratch.
A concise explanation is usually more effective. Focus on what remains unresolved and why the earlier response failed to address it.
The CPGRAMS FAQ states that appeals should generally be filed within 30 days of grievance closure, so it’s important not to delay if you’re planning to challenge the outcome.
The key thing to remember is that CPGRAMS is not just a complaint portal. It’s a structured escalation system. Tracking updates, reviewing Action Taken Reports carefully, and using the appeal mechanism when necessary can often make the difference between a case being administratively closed and a case being genuinely resolved.
Navigating Specific Stuck Passport Scenarios
Not all passport delays look the same. A file stuck at police verification requires a different approach from a Tatkal application that has quietly slipped into the regular queue. Likewise, repeated document requests call for a different strategy than a lost passport reissue.
Understanding the reason behind the delay helps you frame a more effective grievance and request the right remedy instead of sending broad complaints that rarely produce meaningful results.
Escalating Pending or Adverse Police Verification Reports (PVR)
Police verification delays are frustrating enough. An adverse Police Verification Report (PVR) can be even more confusing because applicants are often left guessing about what exactly went wrong.
If the police have raised an objection or flagged an issue, the Regional Passport Office cannot simply reject your application without due process. Under the Passports Act, 1967, applicants must generally be given a reasonable opportunity to respond before an adverse decision is made.
If you suspect an adverse PVR is holding up your application, your CPGRAMS grievance should focus on obtaining clarity.
Rather than asking for immediate issuance of the passport, request:
- Written disclosure of the specific concern raised.
- Details of any documents or clarifications required.
- A reasonable opportunity to respond to the findings.
This approach shifts the conversation from uncertainty to action. Once the exact issue is identified, you can address it directly instead of waiting indefinitely for updates that never arrive.
Resolving Delays in Name Change and Spouse Name Addition
Applications involving name changes or spouse name additions often face extra scrutiny, particularly when supporting documents are not perfectly aligned.
A common scenario involves applicants updating their surname after marriage. In such cases, the RPO may examine:
- Marriage certificates.
- Aadhaar records.
- Gazette notifications, where applicable.
- Self-declarations and supporting identity documents.
Even small inconsistencies between these records can trigger additional review.
If your application is delayed in this category, make sure all submitted documents reflect the same information. A useful reference on formal name change procedures is available here.
When filing a grievance, clearly mention that the required name-change documents were submitted during the PSK appointment and ask the RPO to specify any remaining deficiency or verification requirement. A direct question often produces a more useful response than a general request for an update.
What to Do When Tatkal Passport Applications Lose Their Priority Status
Applicants who pay for Tatkal service understandably expect expedited processing.
That’s why it can be particularly frustrating when a Tatkal application appears to lose momentum and starts moving at the pace of a regular application.
In many cases, applicants are never formally informed that their file has been downgraded or diverted into a standard processing workflow.
If your Tatkal application has exceeded the expected timelines, include the following details in your grievance:
- Date of Tatkal application submission.
- Amount of Tatkal fee paid.
- Current application status.
- Total number of days elapsed since submission.
You should also specifically reference the expedited nature of the application and request either:
- Immediate priority processing, or
- Clarification regarding the loss of Tatkal status.
A grievance that highlights both the additional fee paid and the delayed service often receives closer scrutiny than a generic complaint about processing delays.
Handling Damaged, Lost, or Exhausted Page Passport Reissue Delays
Reissue applications can sometimes involve more scrutiny than first-time passport applications.
This is especially true when the previous passport was lost or damaged.
For lost passport cases, applicants are generally expected to provide supporting documentation regarding the loss, including a police complaint or FIR where required. Guidance on filing an FIR can be found here.
Because these applications often involve additional verification, delays are not uncommon.
If your file is stalled, focus on obtaining a clear list of outstanding requirements.
Instead of repeatedly submitting documents in response to vague requests, ask the RPO to identify every document or clarification still needed to complete processing. Having a complete checklist reduces the risk of multiple rounds of back-and-forth correspondence.
Escaping the Loop of Repeated Document Requests
Few situations are more discouraging than repeatedly being asked for documents.
You submit one document. Weeks later, another request arrives. You provide that too. Then a third request follows.
Sometimes this happens because different officers review the file at different stages. Other times, earlier submissions may not have been properly noted in the record.
Regardless of the cause, this cycle can drag on for months.
If you’re caught in this situation, your grievance should describe the pattern clearly and factually.
For example:
“I submitted [Document A] on [Date] and [Document B] on [Date] as requested. I respectfully request a complete review of my file and a consolidated list of any remaining requirements so that all outstanding issues may be addressed at once.”
This shifts the focus from individual document requests to the larger administrative problem. It also encourages the reviewing officer to assess the entire file rather than continuing the piecemeal approach that caused the delay in the first place.
The key across all these scenarios is specificity. A grievance that identifies the exact bottleneck and requests a clear remedy is far more likely to generate a useful response than one that simply states that the passport is delayed. The more precisely you define the problem, the easier it becomes for the reviewing officer to resolve it.
In-Person Escalations: Passport Adalats and RPO Appointments
While online grievance systems are often enough to resolve delayed passport applications, there are situations where a face-to-face interaction can speed things up considerably.
If your case has been pending for an unusually long time, involves repeated document requests, or has reached a point where written responses are no longer providing clarity, an in-person visit may be worth considering. Meeting the right official with a well-organized file can sometimes accomplish more in one conversation than weeks of email exchanges.
How to Book an RPO Appointment for a Direct Enquiry
Many Regional Passport Offices offer appointments specifically for applicants with pending or problematic cases.
These appointments are different from the standard PSK appointments used for submitting a passport application. Instead, they’re designed to help applicants seek clarification on long-running issues, submit requested documents, or discuss unresolved concerns directly with passport officials.
To check availability, visit:
https://www.passportindia.gov.in
Look for options related to visiting the passport office or booking an enquiry appointment.
Before attending, prepare a complete file containing:
- PSK acknowledgement receipt
- Current application status printout
- Aadhaar or other supporting identity documents
- Copies of previous grievances
- SRN numbers
- CPGRAMS registration details (if applicable)
Showing up prepared makes it much easier for the officer to review your case quickly and provide meaningful guidance.
Understanding the Direct Public Interface at Information Facilitation Centres (IFC)
Not every enquiry requires a formal appointment.
According to the Ministry’s grievance redressal guidance, applicants can often visit the Information Facilitation Centre (IFC) or enquiry counter at their Regional Passport Office during designated public hours.
These counters are intended to help applicants:
- Check application status.
- Submit pending documents.
- Provide requested clarifications.
- Obtain information about delayed applications.
This option can be particularly useful if your grievance response mentions missing documents or additional information but doesn’t clearly explain how or where to provide it.
Rather than waiting for further correspondence, an IFC visit may allow you to hand over the required material directly and receive acknowledgement on the spot.
What is a Passport Adalat and When Should You Attend One?
A Passport Adalat is essentially a special grievance hearing conducted by passport authorities to deal with difficult, long-pending, or unusually complex cases.
These sessions are specifically designed to address matters that have not been resolved through routine channels.
Applicants whose cases have remained pending for several months, despite repeated follow-ups, are often among those who benefit most from attending.
The Ministry’s guidance notes that Passport Adalats are held periodically by passport offices to help clear complex and long-standing cases.
Unlike a regular enquiry counter interaction, a Passport Adalat places your case before senior officials who often have greater authority to review records, identify bottlenecks, and direct corrective action.
If your application has been stuck for six months or more and previous escalation efforts have produced little progress, attending a Passport Adalat can be a worthwhile option.
Details regarding upcoming Adalats can typically be found on:
https://www.passportindia.gov.in
Preparing Your Case File for an In-Person Hearing
When meeting officials in person, organization matters.
The reality is that officers handle large volumes of cases every day. The easier you make it for them to understand your situation, the better your chances of getting useful assistance.
A simple one-page summary can be surprisingly effective.
Include:
- Full name
- ARN
- File number
- Date of application
- Date of PSK appointment
- Current application status
- Date of last status update
- List of grievances filed
- SRNs and CPGRAMS references
- A brief statement explaining the unresolved issue
Think of it as an executive summary of your case.
An officer should be able to glance at the page and understand the entire situation in a minute or two without digging through dozens of documents.
Also bring photocopies of all supporting records and keep your originals with you. It’s generally best practice not to surrender original documents unless specifically required and officially acknowledged.
Utilizing Passport Melas for Difficult Appointment Bookings
In some regions, appointment availability can become a challenge in its own right.
To address this, passport authorities occasionally organize Passport Melas, special drives that release additional appointment slots and expand access to passport services.
These events are particularly helpful in areas experiencing high demand or long appointment backlogs.
The Ministry’s grievance guidance notes that Passport Melas are organized periodically to assist applicants who are struggling to secure appointments through the normal booking process.
If appointment availability is becoming a bottleneck, keep an eye on official announcements here and communications issued by your Regional Passport Office.
Sometimes the fastest route forward is simply gaining access to the right official at the right time. Whether through an enquiry appointment, an IFC visit, a Passport Adalat, or a Passport Mela, in-person engagement can provide a level of visibility and accountability that online systems cannot always match. Used strategically, these options can be powerful tools for breaking through prolonged delays.
Final Avenues for Extreme Passport Delays
Most passport delays are resolved long before they reach this stage. A properly documented CPGRAMS grievance, combined with consistent follow-up, is often enough to get a stalled application moving again.
But every so often, a case drifts far beyond normal timelines. Months pass. Multiple grievances are filed. Responses remain vague or repetitive. At that point, it may be necessary to pursue higher-level escalation channels.
These options should generally be viewed as measures of last resort, reserved for situations where standard remedies have been exhausted without producing meaningful results.
Reaching Out to the Chief Passport Officer and Joint Secretary (CPV)
The Consular, Passport and Visa (CPV) Division of the Ministry of External Affairs sits at the top of India’s passport administration structure. It is headed by the Chief Passport Officer (CPO), who also serves at the Joint Secretary level within the Ministry.
For exceptionally delayed cases, applicants can submit a formal representation directly to the CPV Division.
The Ministry’s grievance redressal document identifies the dedicated passport grievance email as:
passport.grievances@mea.gov.in
This route is generally most appropriate when:
- The application has remained pending for several months.
- Multiple Passport Seva grievances have failed.
- CPGRAMS complaints have not resulted in a meaningful resolution.
- The delay is causing significant personal or professional hardship.
If you choose to escalate to this level, keep the representation concise and well documented. Include your ARN, file number, chronology of events, grievance references, and copies of relevant correspondence.
Some applicants also choose to send a formal written representation by Speed Post to the Chief Passport Officer at the Ministry of External Affairs in New Delhi. A physical letter creates an additional paper trail and can reinforce the seriousness of the matter.
Contacting the Directorate of Public Grievances (DPG) in the Cabinet Secretariat
When ministry-level remedies fail, another avenue exists through the Directorate of Public Grievances (DPG).
Accessible at:
the DPG functions as a higher-level grievance body that examines certain unresolved complaints involving central government departments.
This is not the first place most applicants should turn. By the time you reach the DPG stage, you should ideally have a documented history of:
- Passport Seva grievances.
- Call centre complaints.
- RPO correspondence.
- CPGRAMS complaints and responses.
The DARPG FAQ notes that the Director of Public Grievances conducts grievance hearings, providing citizens with an opportunity to present particularly difficult cases that have not been adequately resolved through conventional channels.
The DPG can also be accessed through the UMANG platform.
For applicants facing truly extraordinary delays, this level of review can provide another layer of scrutiny beyond the ministry itself.
Engaging Effectively with MEA Officials on Social Media (X/Twitter)
Social media is not a substitute for formal grievance procedures, but it can sometimes help draw attention to a stalled case.
The Ministry of External Affairs and Passport Seva maintain active presences on X (formerly Twitter), and public complaints occasionally receive responses when they clearly outline the issue and reference existing grievance records.
If you decide to use social media:
- Stick to verifiable facts.
- Mention the duration of the delay.
- Reference your grievance numbers where appropriate.
- Avoid sharing sensitive personal information such as Aadhaar or PAN details.
- Clearly state the assistance you are seeking.
The most effective posts tend to be calm, factual, and specific. A concise summary of the issue often attracts more attention than a lengthy thread expressing frustration.
Social media visibility alone does not guarantee action, but it can occasionally help bring a long-pending matter to the attention of the relevant officials.
Seeking Legal Recourse and Writ Petitions in the High Court
When a passport delay begins causing serious consequences, legal intervention may become an option.
Examples include situations where delays are leading to:
- Loss of employment opportunities.
- Inability to travel for urgent medical treatment.
- Separation from family members abroad.
- Missed educational or immigration deadlines.
- Other significant hardships.
In such cases, applicants may consult a lawyer regarding the possibility of filing a writ petition under Article 226 of the Constitution before the High Court with jurisdiction over the relevant Regional Passport Office.
The Supreme Court has, through various decisions over the years, recognised the importance of passport-related rights and the need for administrative authorities to act reasonably and within the law.
Additional examples of passport delay disputes and legal discussions can be found through resources like this.
Applicants interested in understanding the legal framework governing passport issuance may also review the Passports Act, 1967 here.
That said, legal proceedings should generally be viewed as the final escalation option. They involve time, expense, and legal representation. Most applicants will find that persistent use of administrative remedies, especially CPGRAMS and higher-level grievance channels, resolves the issue before court intervention becomes necessary.
The key point is that even in the most difficult cases, there are still avenues available. A delayed passport application is frustrating, but it is not a dead end. The system provides multiple levels of review, and applicants who document their efforts carefully are usually in a much stronger position when seeking intervention from higher authorities.
Frequently Asked Questions (FAQ): Stuck Passport Application
This status indicates that your application is currently being evaluated by the Regional Passport Office (RPO). It typically happens if there is a document mismatch, an internal administrative review, or an adverse police verification report. If this status remains unchanged for more than 15 to 30 days without any official communication, you should raise a grievance on the Passport Seva portal before escalating to CPGRAMS.
Yes. If your passport is stuck at the police verification stage for over 30 days, filing a complaint on the PG Portal is highly effective. Ensure you select the Ministry of External Affairs and your specific RPO jurisdiction when filing. The RPO will then formally follow up with the respective Superintendent of Police (SP) office to clear the backlog.
According to official guidelines, departments must respond to PG Portal grievances within 30 days. However, when a complaint includes clear details like the Application Reference Number (ARN) and file number, applicants frequently see an Action Taken Report (ATR) or movement on their Passport Seva tracker within 7 to 15 days.
Do not assume the process is over. If your complaint is marked as closed but your passport remains stuck, use the portal to rate the resolution as “Poor.” This rating unlocks the option to file a formal appeal. Filing an appeal escalates your file to a higher-ranking appellate authority within the Ministry for a mandatory secondary review.
No. While booking an RPO enquiry appointment is a great way to resolve complex issues face-to-face, it is not a strict prerequisite for CPGRAMS. You are only expected to complete first-level escalation—such as logging a standard Passport Seva grievance or calling the National Call Centre (1800-258-1800)—before submitting your issue to the PG Portal.
Taking Control of Your Passport Application Journey
When a passport application gets stuck, it can feel like you’re trapped in a system that offers very little visibility. The status never changes, nobody can give you a clear answer, and every follow-up seems to lead back to the same generic response. It’s easy to feel as though you’ve run out of options.
Fortunately, that isn’t the case.
The PG Portal gives applicants a structured way to escalate unresolved passport issues through an official government channel. Instead of relying on informal follow-ups, you can raise a documented grievance that is assigned, tracked, and subject to defined response timelines.
The process works best when approached methodically. Start with the channels built into the Passport Seva ecosystem. Raise a grievance through the portal, contact the National Call Centre, and communicate with the relevant Regional Passport Office. Keep records of every interaction, no matter how routine it may seem at the time.
If those efforts fail to produce a meaningful response, CPGRAMS becomes a powerful next step. A well-written grievance supported by timelines, reference numbers, and relevant documents is far more likely to receive serious attention than a vague request for an update.
Just as importantly, don’t stop at submission. Track your grievance, review the Action Taken Reports carefully, and make use of the appeal process if the response does not genuinely address the issue.
Patience, Persistence, and the Power of Proper Escalation Channels
The applicants who tend to achieve the best outcomes are not necessarily the ones who follow up most often. They’re usually the ones who follow up most effectively.
That means using the right channel at the right time, maintaining clear records, and building a documented trail of every escalation. Each complaint number, email, status screenshot, and grievance reference becomes part of a larger record that demonstrates you’ve followed the prescribed process and given the authorities multiple opportunities to resolve the issue.
Over time, that documentation carries weight. Whether your case eventually lands with an RPO officer, a Passport Adalat, the CPGRAMS appellate authority, or a higher grievance body, a complete and organized record makes it much easier for officials to understand what has happened and what still needs to be done.
Passport delays can be frustrating, sometimes intensely so. But frustration alone rarely moves a file forward. A structured approach, backed by evidence and persistence, often does.
Use each escalation channel deliberately. Keep your records organized. Stay patient, but don’t become passive. When handled systematically, even long-delayed applications can be brought back into motion and pushed toward a final resolution.


Leave a Reply